Refraction of Light (Cambridge (CIE) O Level Physics): Revision Note
Exam code: 5054
Did this video help you?
Ray Diagrams for Refraction
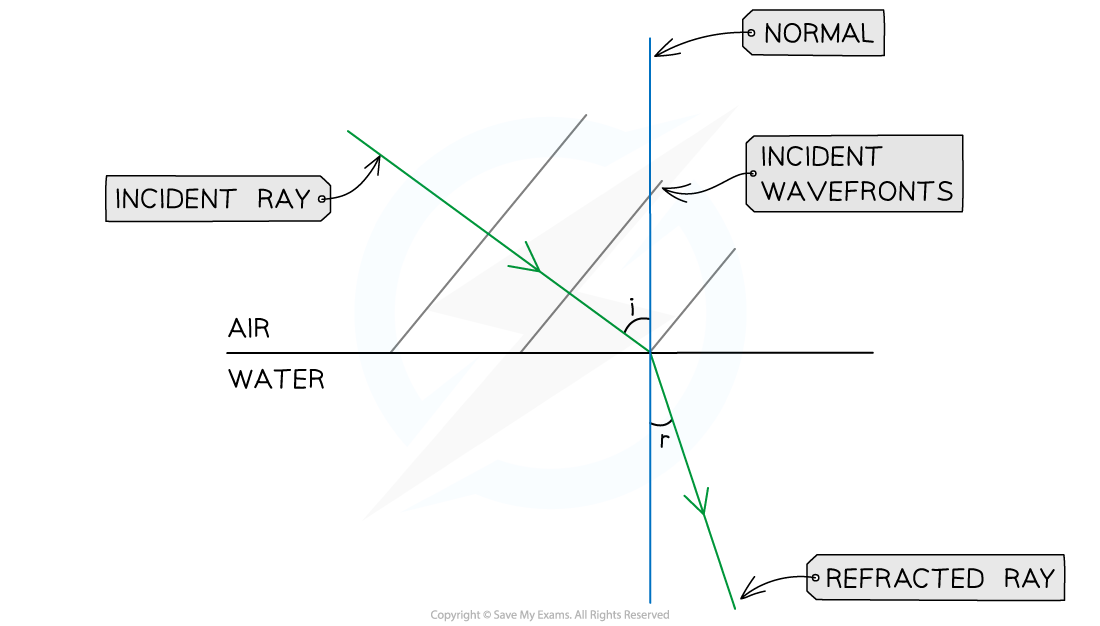
When drawing refraction ray diagrams, angles are measured between the wave direction (ray) and a line at 90 degrees to the boundary
The angle of the wave approaching the boundary is called the angle of incidence (i)
The angle of the wave leaving the boundary is called the angle of refraction (r)
The line at right angles (90°) to the boundary is known as the normal
When drawing a ray diagram an arrow is used to show the direction the wave is travelling
An incident ray has an arrow pointing towards the boundary
A refracted ray has an arrow pointing away from the boundary
The angles of incidence and refraction are usually labelled i and r respectively
The change in direction depends on which media the light rays pass between:
From less dense to more dense (e.g air to glass), light bends towards the normal
From more dense to less dense (e.g. glass to air), light bends away from the normal
When passing along the normal (perpendicular) the light does not bend at all
Refraction from Less Dense Medium to More Dense Medium

A ray diagram for light refracting at a boundary, showing the normal, angle of incidence and angle of refraction. The ray bends towards the normal as it is passing into a more dense medium.
Investigating Refraction
Aim of the Experiment
To investigate the refraction of light using rectangular blocks, semi-circular blocks and triangular prisms
Variables
Independent variable = shape of the block
Dependent variable = direction of refraction
Control variables:
Width of the light beam
Same frequency / wavelength of the light
Equipment List
Energy Store | Description |
|---|---|
Ray box | to provide a narrow beam of light to refract in the perspex blocks |
Protractor | to measure the angles of refraction |
Sheet of paper | to mark the rays of light and the outlines of the blocks |
Pencil | Magnetic interacting with each other have energy in their magnetic store |
Ruler | to draw the rays of light and the outlines of the blocks |
Perspex blocks (rectangular, semi-circular & prism) | to refract the rays of light |
Resolution of measuring equipment:
Protractor = 1°
Ruler = 1 mm
Ray Box and Blocks

Diagram showing a ray box alongside three different shaped glass blocks
Method
Diagram Showing Tracing Method

Apparatus to investigate refraction
Place the glass block on a sheet of paper, and carefully draw around the rectangular perspex block using a pencil
Switch on the ray box and direct a beam of light at the side face of the block
Mark on the paper:
A point on the ray close to the ray box
The point where the ray enters the block
The point where the ray exits the block
A point on the exit light ray which is a distance of about 5 cm away from the block
Draw a dashed line normal (at right angles) to the outline of the block where the points are
Remove the block and join the points marked with three straight lines
Replace the block within its outline and repeat the above process for a ray striking the block at a different angle
Repeat the procedure for each shape of perspex block (prism and semi-circular)
Analysis of Results
Consider the light paths through the different-shaped blocks
Rays Passing through the Blocks

Refraction of light through different shapes of perspex blocks
The final diagram for each shape will include multiple light ray paths for the different angles of incidences (i) at which the light strikes the blocks
This will help demonstrate how the angle of refraction (r) changes with the angle of incidence
Label these paths clearly with (1) (2) (3) or A, B, C to make these clearer
Angles i and r are always measured from the normal
For light rays entering the perspex block, the light ray refracts towards the central line:
i > r
For light rays exiting the perspex block, the light ray refracts away from the central line:
i < r
When the angle of incidence is 90° to the perspex block, the light ray does not refract, it passes straight through the block:
i = r
Evaluating the Experiment
Systematic Errors:
An error could occur if the 90° lines are drawn incorrectly
Use a set square to draw perpendicular lines
Random Errors:
The points for the incoming and reflected beam may be inaccurately marked
Use a sharpened pencil and mark in the middle of the beam
The protractor resolution may make it difficult to read the angles accurately
Use a protractor with a higher resolution
Safety Considerations
The ray box light could cause burns if touched
Run burns under cold running water for at least five minute
Looking directly into the light may damage the eyes
Avoid looking directly at the light
Stand behind the ray box during the experiment
Keep all liquids away from the electrical equipment and paper
Examiner Tips and Tricks
In your examination, you might be asked to write a method explaining how you might investigate the refraction of light through different shaped blocks
As part of this method you should describe:
What equipment you need
How you will use the equipment
How you will trace the rays of light before, while and after they pass through the block

Unlock more, it's free!
Did this page help you?