Identifying Apparatus (Edexcel International AS Physics): Revision Note
Exam code: XPH11
Identifying Apparatus
When planning an experiment, the first step is to identify the apparatus required
Each experiment will have its own unique set of apparatus
The apparatus is the equipment needed to carry out the experiment
This includes both what you are measuring and how you are measuring it
Common apparatus include:
Metre rulers - to measure distance and length
Balances - to measure mass
Protractors - to measure angles
Stopwatches - to measure time
Ammeters - to measure current
Voltmeters - to measure potential difference
More complicated instruments such as the micrometer screw gauge and Vernier calipers can be used to more accurately measure length

Examples of apparatus used in scientific experiments
The apparatus required depends on what you are trying to measure
A few examples are shown in the table below
Apparatus Table
Quantity | Apparatus |
Length | Metre ruler, Micrometer, Vernier caliper |
Mass | Top–pan balance |
Angle | Protractor |
Time | Stopwatch |
Temperature | Thermometer |
Potential difference | Voltmeter |
Current | Ammeter |
Frequency | Oscilloscope |
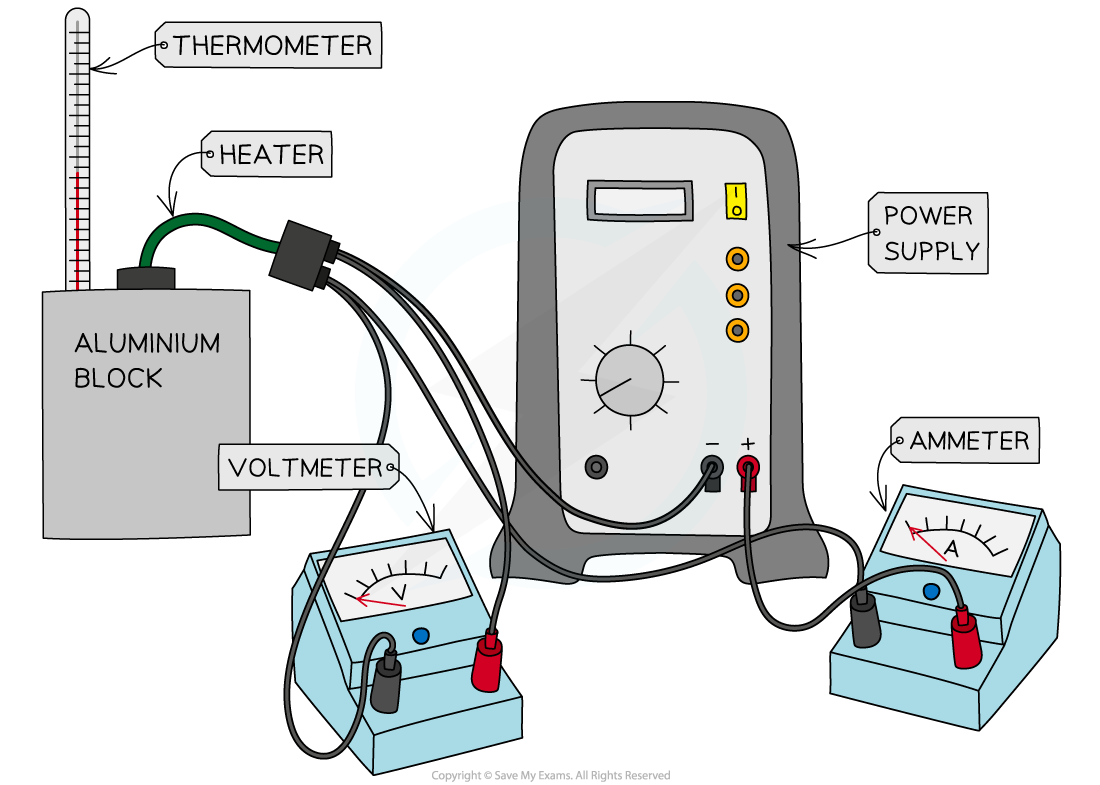
An example of apparatus for measuring the specific heat capacity of an aluminium block is shown below:

Apparatus needed to measure specific heat capacity
This includes:
A block of the substance (preferably 1kg in mass) or in the case of a fluid, a beaker containing a known mass of the fluid
A thermometer
An appropriate heater (e.g. an immersion heater)
A power source
A joule meter or a voltmeter, ammeter and stop-clock (I will assume we have the latter)
Wires and connectors
Worked Example
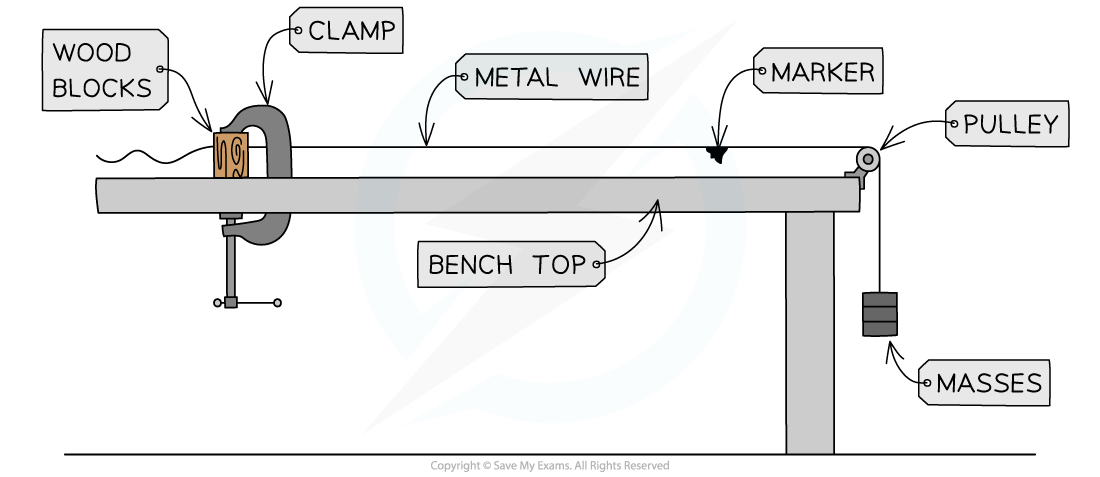
The diagram below shows one possible method for determining the Young modulus of a metal in the form of a wire.

Describe how you can use this apparatus to determine the Young modulus of the metal. The sections below should be helpful when writing your answers.
The measurements to be taken.
The equipment used to take the measurements.
How you would determine Young modulus from your measurements.
Answer:
Step 1: State the necessary measurements to be taken
The diameter of the wire
The initial length of the wire
The extension of the wire (final length – initial length)
The mass of the hanging masses or the weight applied to the wire
Step 2: State and explain which equipment would be the most suitable
For measuring the diameter of the wire:
A micrometer screw gauge or vernier callipers
Micrometer would be best as this has the highest resolution when measuring small areas
For measuring the original length / extension of the wire:
A metre ruler or a tape measure
The wire has a moderate length which cannot be measured using a vernier scale
For measuring extension:
Travelling microscope
These are designed for measuring small changes in length
For measuring the mass:
Scales or a top-pan balance
A top-pan balance would be best as this has the higher resolution
W = mg equation can be used to calculate weight
For measuring the weight directly:
A newton-meter
This is useful if ‘known’ weights are used and to check if the quoted masses are accurate
Step 3: Explain how Young's modulus can be determined from these measurements
Young modulus is equal to the gradient of a stress-strain graph (in the linear region)
Stress is equal to:

Strain is equal to:

Where:
F = weight (N)
A = cross-sectional area of wire (m2)
ΔL = extension (m)
L = original length (m)
Young's modulus for this metal is then calculated using the following equation:

Examiner Tips and Tricks
When listing the apparatus for an experiment, make sure you've referred to every last piece of equipment, even the small parts such as wires and power supplies

Unlock more, it's free!
Did this page help you?