Fleming's Left-Hand Rule (Oxford AQA IGCSE Physics): Revision Note
Exam code: 9203
Fleming's Left-Hand Rule
The direction of the force (also known as the thrust) on a current-carrying wire depends on the direction of the current and the direction of the magnetic field
All three will be perpendicular to each other
This means that sometimes the force could be into and out of the page (in 3D)
The direction of the force (or thrust) can be worked out by using Fleming's left-hand rule:
Fleming's left-hand rule

Fleming’s left-hand rule can be used to show that the current-carrying wire in the magnetic field shown below will experience a downward force
Current into the plane of the page

Step 1: Determine the direction of the magnetic field
Start by pointing your First Finger in the direction of the (magnetic) Field
Step 2: Determine the direction of the current
Now rotate your hand around the first finger so that the seCond finger points in the direction of the Current
Step 3: Determine the direction of the force
The THumb will now be pointing down, in the direction of the THrust (the force)
Therefore, this will be the direction in which the wire will move
Different orientation of the left-hand rule

It is important to note that the direction of the force is reversed if either:
The direction of the current is reversed
The direction of the magnetic field is reversed
Examiner Tips and Tricks
Remember that the magnetic field is always in the direction from North to South and current is always in the direction of a positive terminal to a negative terminal.
If you get a question about Fleming's left-hand rule in your exam, then you must actually use your hand to work it out. Don't worry, the invigilators will know what you are doing.
Electric Motors
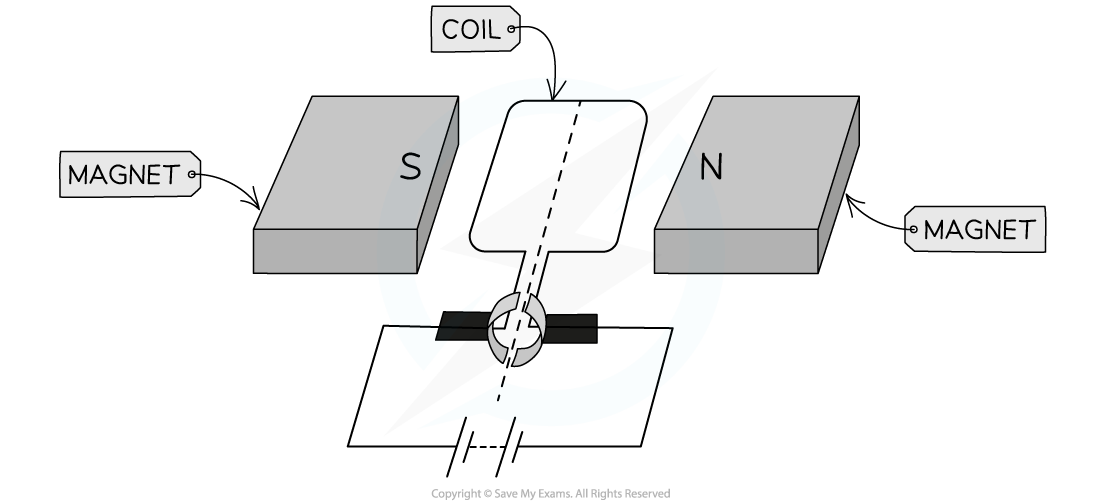
The motor effect can be used to create a simple electric motor
The force on a direct current-carrying coil (loop of wire) is used to make it rotate in a single direction
While the generator uses force on a coil to produce an alternating current, the motor uses a direct current to produce a force which rotates the coil
The simple dc motor consists of a coil of wire (which is free to rotate) positioned in a uniform magnetic field
The coil of wire forms a complete circuit with a cell
The coil is attached to a split ring (a circular tube of metal split in two)
This split ring is connected in a circuit with the cell via conducting carbon brushes
Forces on the horizontal coil in a motor

Forces act in opposite directions on each side of the coil, causing it to rotate:
In the image above, current travels towards the cell through the blue side of the coil, so the force acts upwards (using Fleming's left-hand rule)
On the black side, current flows away from the cell so the force acts downwards
After rotating 180°, the split ring reconnects with the carbon brushes and current flows through the coil again
Now the blue side is on the right and the black side is on the left
Current still flows toward the cell on the left and away from the cell on the right, even though the coil has flipped
The black side of the coil experiences an upward force on the left and the blue side experiences a downward force on the right
The coil continues to rotate in the same direction, forming a continuously spinning motor
Forces on the coil when rotated 180°

Worked Example
An electric motor is set up as shown below.

Determine whether the coil will be rotating clockwise or anticlockwise.
Answer:
Step 1: Draw arrows to show the direction of the magnetic field lines
These will go from the north pole of the magnet to the south pole of the magnet

Step 2: Draw arrows to show the direction the current is flowing in the coils
Current will flow from the positive terminal of the battery to the negative terminal

Step 3: Use Fleming’s left-hand rule to determine the direction of the force on each side of the coil
Start by pointing your First Finger in the direction of the (magnetic) Field
The magnetic field points from north to south
So the first finger points from right to left
Now rotate your hand around the first finger so that the seCond finger points in the direction of the Current
Current flows from positive to negative
Current flows into the page on the positive side of the coil, and out of the page on the negative side of the coil
The THumb will now be pointing in the direction of the THrust (the force)
The force will act upwards on the positive side of the coil and downwards on the negative side of the coil

Step 4: Use the force arrows to determine the direction of rotation
The coil will be turning clockwise
Examiner Tips and Tricks
You will get the same answer using either side of the coil as long as you have used the left-hand rule correctly. It is a good idea to test both sides to make sure your answer is the same.
The main thing you need to be aware of is that a coil in an external field tends to rotate, and you will have to determine the direction of this rotation using Fleming's left-hand rule.
The brushes and split rings explain how the current always points in the same direction relative to the magnet, but don't get caught up in the details of these when answering exam questions.

Unlock more, it's free!
Did this page help you?