Light Microscopes (OCR GCSE Combined Science A (Gateway)): Revision Note
Exam code: J250
Microscope Equipment
Many biological structures are too small to be seen by the naked eye
Optical microscopes are an invaluable tool for scientists as they allow for tissues, cells and organelles to be seen and studied
Light is directed through a thin layer of biological material (containing the tissue(s), cell(s) or organelle(s) to be observed) that is supported on a glass slide
This light is focused through several lenses so that an image is visible through the eyepiece
Apparatus
The key components of an optical microscope you will need to use are:
The eyepiece lens
The objective lenses
The stage
The light source
The coarse and fine focus
Other apparatus used:
Forceps
Scissors
Scalpel
Coverslip
Slides
Pipette

The components of an optical microscope
Calibration, Sample Prep & Setup
Preparing specimens & samples
Specimens must be prepared on a microscope slide to be observed under a light microscope
This must be done carefully to avoid damaging the biological specimen and the structures within it
The most common specimens to observe under a light microscope are cheek cells (animal cells) and onion cells (plant cells)
Preparing a slide using a liquid specimen:
Add a few drops of the sample to the slide using a pipette
Cover the liquid/smear with a coverslip and gently press down to remove air bubbles
Wear gloves to ensure there is no cross-contamination of foreign cells
Preparing a slide using a solid specimen:
Use scissors to cut a small sample of the tissue
Peel away or cut a very thin layer of cells from the tissue sample to be placed on the slide (using a scalpel or forceps)
Some tissue samples need to be treated with chemicals to kill/make the tissue rigid
Gently place a coverslip on top and press down to remove any air bubbles
A stain may be required to make the structures visible depending on the type of tissue being examined.
Commonly used stains include methylene blue to stain cheek cells and iodine to stain onion cells
Take care when using sharp objects and wear gloves to prevent the stain from dying your skin
Preventing the dehydration of tissue:
The thin layers of material placed on slides can dry up rapidly
Adding a drop of water to the specimen (beneath the coverslip) can prevent the cells from being damaged by dehydration

Care must be taken to avoid smudging the glass slide or trapping air bubbles under the coverslip
Viewing the specimen
When using an optical microscope always start with the low power objective lens:
It is easier to find what you are looking for in the field of view
This helps to prevent damage to the lens or coverslip in case the stage has been raised too high
Unclear or blurry images:
Switch to the lower power objective lens and try using the coarse focus to get a clearer image
Consider whether the specimen sample is thin enough for light to pass through to see the structures clearly
There could be cross-contamination with foreign cells or bodies
A calibrated graticule must be used to take measurements of cells
A graticule is a small disc that has an engraved scale. It can be placed into the eyepiece of a microscope to act as a ruler in the field of view
As a graticule has no fixed units it must be calibrated for the objective lens that is in use. This is done by using a scale engraved on a microscope slide (a stage micrometer)
By using the two scales together the number of micrometers each graticule unit is worth can be worked out
After this is known the graticule can be used as a ruler in the field of view

The stage micrometer scale is used to find out how many micrometers each graticule unit represents
Limitations of microscopy
The size of cells or structures of tissues may appear inconsistent in different specimen slides
Cell structures are 3D and the different tissue samples will have been cut at different planes resulting in inconsistencies when viewed on a 2D slide
Optical microscopes do not have the same magnification power as other types of microscopes and so there are some structures that cannot be seen
The treatment of specimens when preparing slides could alter the structure of cells
Using units in microscopy
You may be given a question in your Biology exam where the measurements for a magnification calculation have different units
You need to ensure that you convert them both into the same unit before proceeding with the calculation (usually to calculate the magnification)
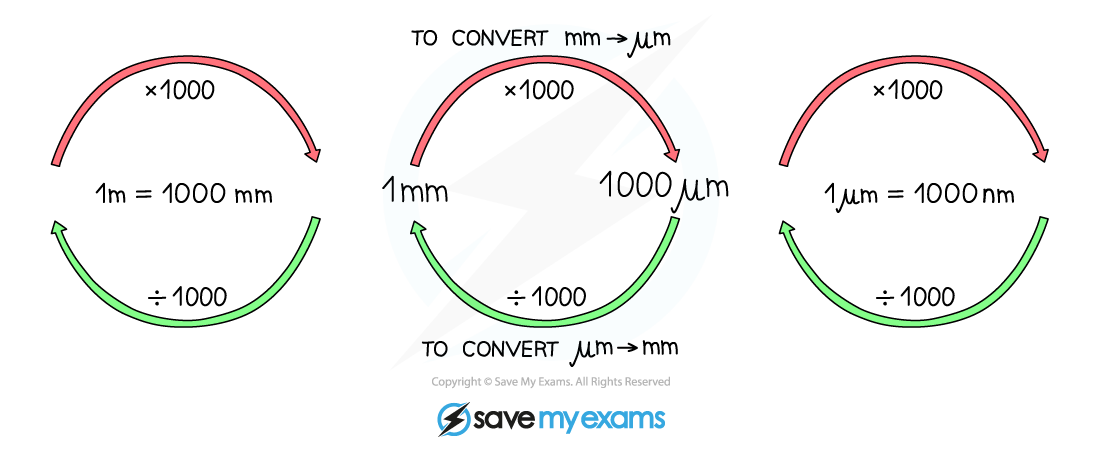
Remember the following to help you convert between mm (millimetres), µm (micrometres) and nm (nanometres):

Converting between mm (millimetres), µm (micrometres) and nm (nanometres)
If you are given a question with two different units in it, make sure you make a conversion so that both measurements have the same unit before doing your calculation
Calculation of Magnification
Higher Tier Only
Magnification is calculated using the following equation:
Magnification = Drawing size ÷ Actual size
One way to remember the equation is using an equation triangle:

An equation triangle for calculating magnification
Rearranging the equation to find things other than the magnification becomes easy when you remember the triangle – whatever you are trying to find, place your finger over it and whatever is left is what you do, so:
Magnification = image size ÷ actual size
Actual size = image size ÷ magnification
Image size = actual size × magnification
Remember magnification does not have any units and is just written as ‘X 10’ or ‘X 5000’
Worked Example
An image of an animal cell is 30 mm in size and it has been magnified by a factor of X 3000. What is the actual size of the cell?
To find the actual size of the cell:

Worked example using the equation triangle for magnification
You may also be asked to calculate the total magnification of a light microscope if given the magnification of the eyepiece lens and the magnification of the objective lens
As these are two separate parts of a light microscope, each with its own magnifying power, you can simply multiply the two values to calculate the total magnification:
Magnification of light microscope = Magnification of eyepiece lens × Magnification of objective lens
Standard form
When doing calculations and unit conversions, it is common to come across very big or very small numbers
Standard form can be useful when working with these numbers
Standard form is a way of writing very big and very small numbers using powers of 10
How to use standard form
Using standard form, numbers are always written as follows: a × 10n
The rules:
1 ≤ a < 10 (the number 'a' must always be between 1 and 10)
n > 0 for LARGE numbers ('n' = how many times 'a' is multiplied by 10)
n < 0 for SMALL numbers ('n' = how many times 'a' is divided by 10)
Using standard form to convert between units
For example, you can write 1 metre in millimetres using standard form:
1 m = 1000 mm
So, 1 m = 1 mm × 1000
So, 1 m = 1 mm × 10 × 10 × 10
So, as we had to multiply 1 mm by 10 three times to get 1 m, we write this as:
1 m = 1 × 103 mm
Writing 1 millimetre in metres using standard form is also possible and is just the opposite:
1 mm = 0.001 m
So, 1 mm = 1 m ÷ 1000
So, 1 mm = 1 m ÷ 10 ÷ 10 ÷ 10
So, as we had to divide 1 m by 10 three times to get 1 mm, we write this as:
1 mm = 1 × 10⁻³ m
Exactly the same process can be used if you needed to convert micrometres into millimetres. For example:
1 µm = 0.001 mm
So, 1 µm = 1 mm ÷ 1000
So, 1 µm = 1 mm ÷ 10 ÷ 10 ÷ 10
So, as we had to divide 1 mm by 10 three times to get 1 µm, we write this as:
1 µm = 1 × 10⁻³ mm
Examples of using standard form in conversion calculations
You could be asked to state 45 centimetres in millimetres using standard form:
1 cm = 10 mm
So, 45 cm = 450 mm
So, 45 cm = 4.5 mm × 10 × 10
So, as we had to multiply 4.5 mm by 10 two times to get 45 cm, we write this as:
45 cm = 4.5 × 102 mm
You could also be asked to state 250 micrometres in millimetres using standard form:
1 µm = 0.001 mm
So, 250 µm = 0.25 mm
So, 25 µm = 2.5 mm ÷ 10
So, as we had to divide 2.5 mm by 10 just once to get 250 µm, we write this as:
250 µm = 2.5 × 10⁻¹ mm
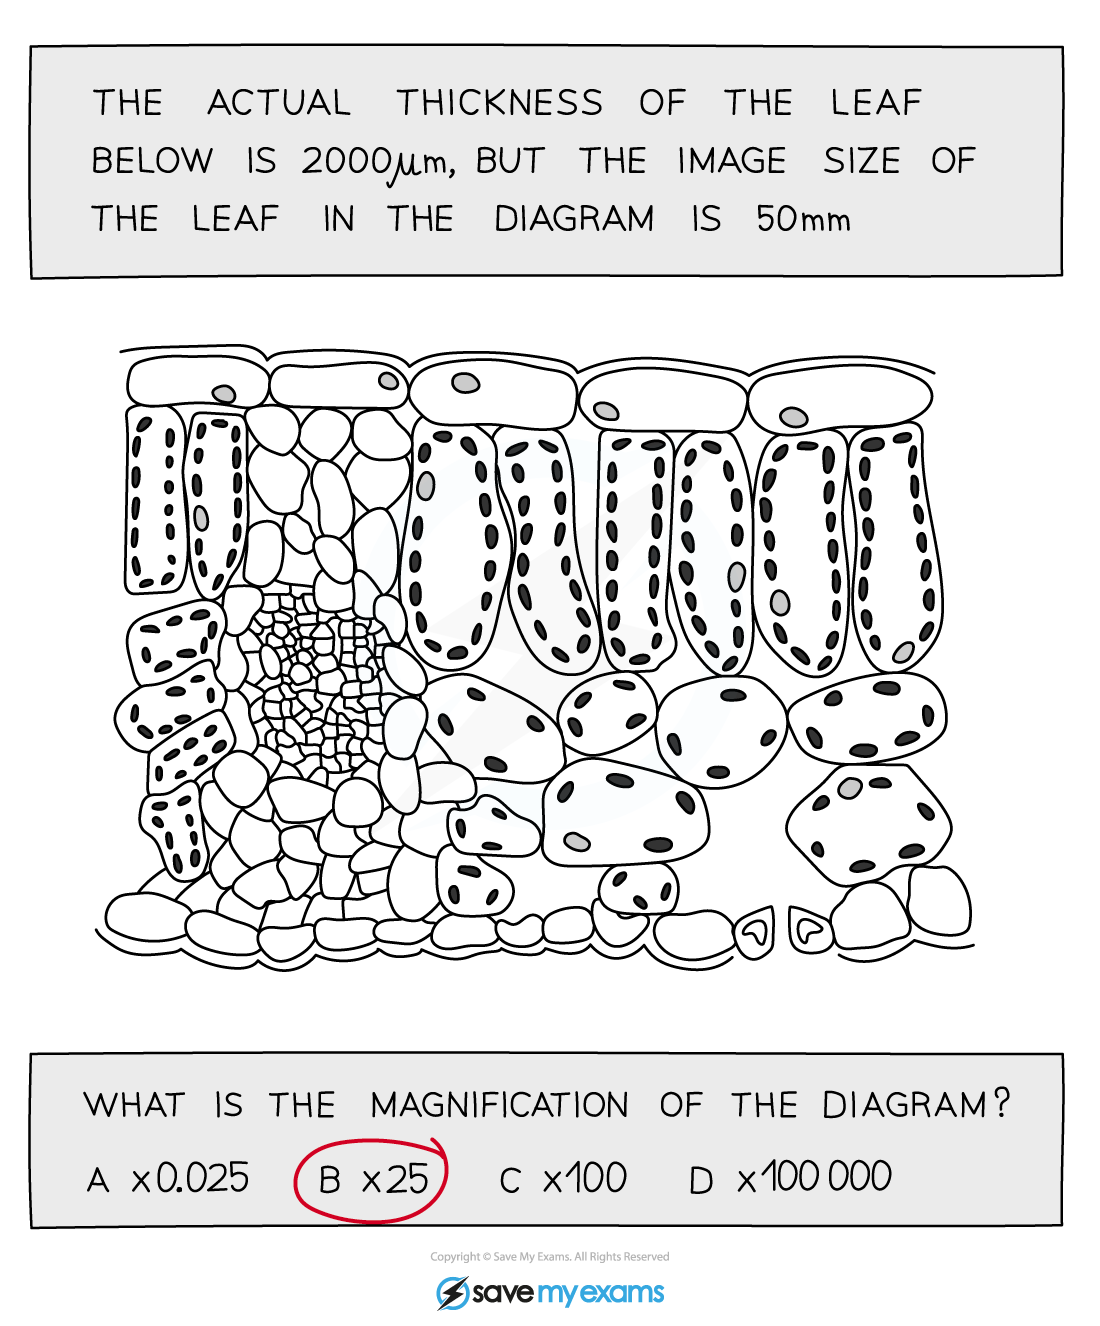
Worked Example

Answer:
Step One: Convert units
Remember that 1 mm = 1000 µm
So to get from µm to mm you need to divide by 1000
Step Two: Calculate the thickness of the leaf in mm
2000 ÷ 1000 = 2, so the actual thickness of the leaf is 2 mm and the drawing thickness is 50 mm
Step Three: Put these values into the equation for calculating magnification
Magnification = image size ÷ actual size = 50 ÷ 2 = 25
So the magnification is x 25
Examiner Tips and Tricks
It is easy to make silly mistakes with magnification calculations. To ensure you do not lose marks in the exam:
Always look at the units that have been given in the question – if you are asked to measure something, most often you will be expected to measure it in millimetres NOT in centimetres – double-check the question to see!
Learn the equation triangle for magnification and always write it down when you are doing a calculation – examiners like to see this!

Unlock more, it's free!
Did this page help you?