Sources of Uncertainty (OCR A Level Physics) : Revision Note
Random & Systematic Errors
Measurements of quantities are made with the aim of finding the true value of that quantity
In reality, it is impossible to obtain the true value of any quantity as there will always be a degree of uncertainty
The uncertainty is an estimate of the difference between a measurement reading and the true value
Random and systematic errors are two types of measurement errors that lead to uncertainty
Random error
Random errors cause unpredictable fluctuations in an instrument’s readings as a result of uncontrollable factors, such as environmental conditions
This affects the precision of the measurements taken, causing a wider spread of results about the mean value
To reduce random error:
Repeat measurements several times and calculate an average from them
Systematic error
Systematic errors arise from the use of faulty instruments used or from flaws in the experimental method
This type of error is repeated consistently every time the instrument is used or the method is followed, which affects the accuracy of all readings obtained
To reduce systematic errors:
Instruments should be recalibrated, or different instruments should be used
Corrections or adjustments should be made to the technique

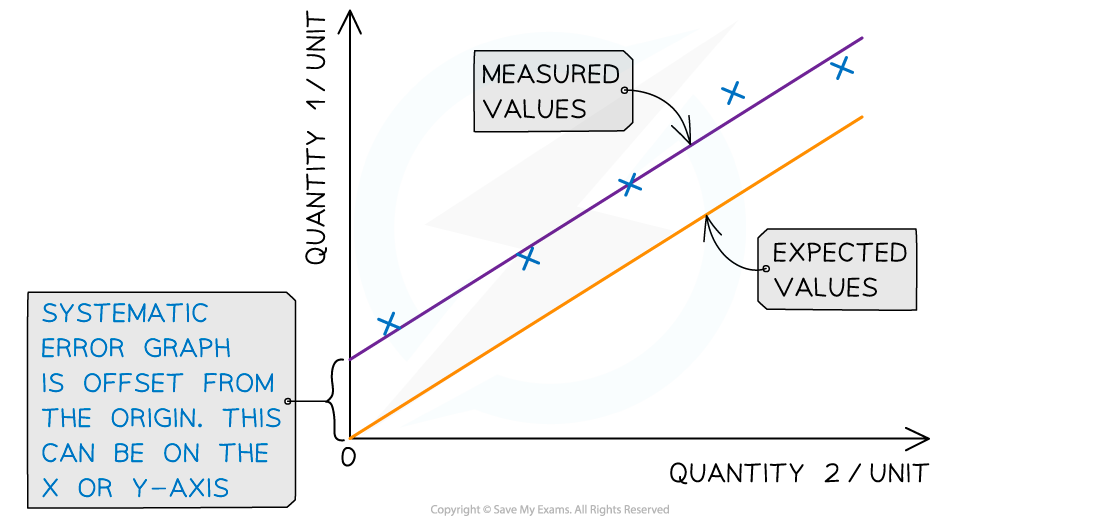
Systematic errors on graphs are shown by the offset of the line from the origin
Zero error
This is a type of systematic error which occurs when an instrument gives a reading when the true reading is zero
For example, a top-ban balance that starts at 2 g instead of 0 g
Zero errors can be removed by taking the difference of the offset from each value
Eg. If a scale starts at 2 g instead of 0 g, a measurement of 50 g would actually be 50 - 2 = 48 g
The offset could be positive or negative
Precision & Accuracy
Precision
Precise measurements are ones in which there is very little spread about the mean value, in other words, how close the measured values are to each other
If a measurement is repeated several times, it can be described as precise when the values are very similar to, or the same as, each other
The precision of a measurement is reflected in the values recorded - measurements to a greater number of decimal places are said to be more precise than those to a whole number
Accuracy
A measurement is considered accurate if it is close to the true value
The accuracy can be increased by repeating measurements and finding a mean of the results
Repeating measurements also helps to identify anomalies that can be omitted from the final results

The difference between precise and accurate results

Representing precision and accuracy on a graph
Examiner Tips and Tricks
It is a very common mistake to confuse precision with accuracy - measurements can be precise but not accurate if each measurement reading has the same error.Make sure you learn that precision refers to the ability to take multiple readings with an instrument that are close to each other, whereas accuracy is the closeness of those measurements to the true value.

You've read 0 of your 5 free revision notes this week
Unlock more, it's free!
Did this page help you?
